|
|
Post by blck87gtconv on Nov 22, 2004 0:29:52 GMT -5
|
|
|
|
Post by blck87gtconv on Nov 22, 2004 0:30:25 GMT -5
|
|
|
|
Post by blck87gtconv on Nov 22, 2004 0:33:00 GMT -5
I went through the same dilemma for over a year, had 3 starters, new battery, new alternator, still would not start especially when it was hot. The starter would click but not turn over. The problem was the small wire going to the starter. As these cars age, there is a build up of resistance from all the lengths that small wire goes from clutch switches, relays, etc..etc..... The solution is to go get yourself a 12V relay and wire it up in the engine compartment. The relay acts as a power booster for that small wire going to the starter, your car will start like never before. My car starts so strong now that it is funny. The wiring diagram available at the12volt.com, goes like this Connect terminal #87 to 12 volt constant, #85 to ground, terminal #86 to the ignition side of the small wire, and terminal #30 to starter. - 88gts 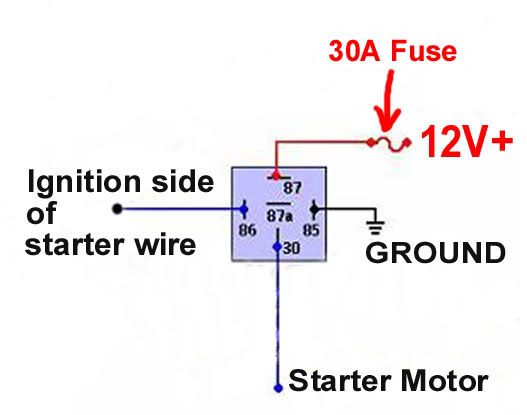 The relay you need is available at a car stereo shop or auto store shouldn't be over $5 US dollars. The relay should be SPDT. Single Pole Double Throw Relay. (picture provided by TheRealMan) What you want to do is get some 12 or 16 gauge primary wire and a fuse holder with a 30 amp fuse. Following this diagram, first find a location by the battery to mount relay 1 screw. Get some solderless spade connectors. Connect fuse holder to battery (w/o fuse for now) extend the wire to the pin 87, ground pin 85 to the chassis with short wire, find the small wire going to the starter unclip the disconnect by the header, cut off this disconnect, solder on some longer wire to reach the relay connect the side going to your ignition switch to pin 86, then connect the starter side to pin 30, finally put in your 30 amp fuse, and start her up. Hope this works for you. Let me know. Sean - 88gts I think I used 12 gauge primary wire for all of it just to be safe, and some of those yellow solderless spade connectors (same kind used on speakers) to connect the wires to the relay, but I soldered the wires around the starter due to the heat. I think it took me about an hour. It is best to plan it all out get all the parts first. This is actually the only way to wire the relay it is only 4 wires. Good luck! - 88gts The thread where all of this information originated can be found here.Posted by Dynamictuner dynamictuner ST Crew Member # 9202 posted September 01, 2004 09:23 PM -------------------------------------------------------------------------------- Well I finally got around to fixing my starter issue and I must say it was very simple. Just like you read have all the materials needed (2 Yellow Solderless splicers the cyclinder ones, 4 blue Solderless female connectors, 2 yellow Solderless spliters 1 for ground and 1 for power). Next Have your wire with a fuse holder. Disconnect your ground cable on ur batter please before you do this , Also have your wire handy I used some old computer power cord wire (inside the cable its like 14 guage maybe so I doubled it up on everything.) Next just look at this diagram and its self explanitory. - If the pic dont show click here Click Here Feel free to use this but Im sure it will help some of you out I will post some more pics of the actual finished project tomorrow. |
|
|
|
Post by blck87gtconv on Nov 22, 2004 0:35:09 GMT -5
SlikSX ST Crew Member # 10128 posted August 21, 2004 10:21 AM -------------------------------------------------------------------------------- Thought I might share this afternoon's activities with you all! Has your passenger side driver's seat stopped sliding forward automatically when you pull the tilt lever? Don't want to fork out for a new seat rail? Got $0.10 or a few centimetres of wire? Chances are that the dodgy little clip that releases the seat rail is busted - but never fear, follow these instructions and it'll be sliding like new in no time! Step 1 Remove the seat!  Step 2 Locate the end of the pull cable and the tab it is suppposed to hook on to.   Step 3 Loosen the bolts holding the end of the cable guide and adjust it so that its as far back as possible, this will give you some extra space needed in the next step.  Step 4 Somehow reattach the end of the cable to the tab on the seat rail. It must be very securely tied together as a lot of force it put on this join to release the seat (which would explain why it breaks so easily). I used a piece of tie wire i found under the sink (!?), but also tried cable ties (which were too thick, jammed in the rail and snapped easily) and a piece of steel rope (which i couldn't put a decent knot in, and hence kept slipping). If you have the time it's probably worth soldering or welding these bits together, but the wire still works fine. Step 5 Test that it works! When you pull the tilt lever and let the seat-back tilt all the way forward BOTH seat rails should now move freely. If not, or only one does, then you don't have enough tension in the cable (ie. your knot is too long and the tab isn't being pulled far enough out to release the seat rails). Try tying the cable closer to the tab, or backing the cable guide out some more. Step 6 Put the seat back in the car, and let your passengers enjoy back seat access the way it should be! :: Click here to visit my site with enlarged pictures :: |
|
|
|
Post by blck87gtconv on Nov 22, 2004 0:39:36 GMT -5
Fiberglass Parts:
Dario
ST Crew
Member # 9740
posted October 02, 2004 10:43 PM
Hi, Im proud to announce that we are finally offering every single fiberglass part that you may need for your Celicas from 1st to 7th generation.
We also do custom bodykits, sideskirts, scoops and wings.
Just send an email to maxell666@libero.it and I will let you know the price and the time to make it and ship to your door.
Best quality and best prices around!! Give us a try, you won't be disappointed!
Also all kind of custom paintjobs and body work if you are in the Miami area. Free pickup and return to your door!
maxell666@libero.it
786-597-3996 for info.
|
|
|
|
Post by blck87gtconv on Nov 22, 2004 0:40:49 GMT -5
Rick89GTS 3SGTE Crew Member # 6543 4th Gen HEATER QUICK FIX For a temporary quick fix: undo the piano-wire loop on the heater inlet located on the firewall. Push the lever all the way to the rear for heat. Slide down by the passenger side left footwell beside the heater. Unclip the white plastic clip that holds the heater vent control arm. Push the lever all the way forward and that will allow heat to enter the cabin. (If you don't unhook the arm, intermittent contact will cause it to default back to the cold position.) This will get you through winter but the long term fix is the soldering repair. I've done 4 already [Ugh] It ain't too bad. [HeHe] 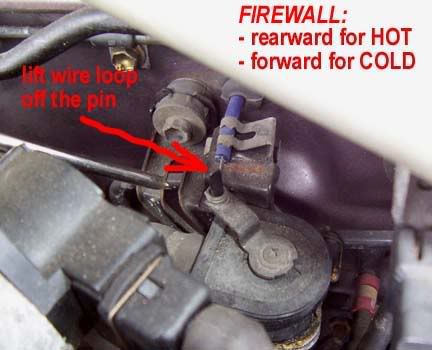 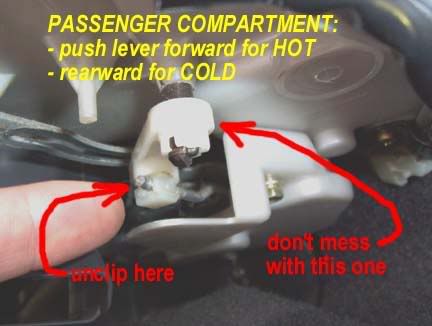 Photo credit: psnarula  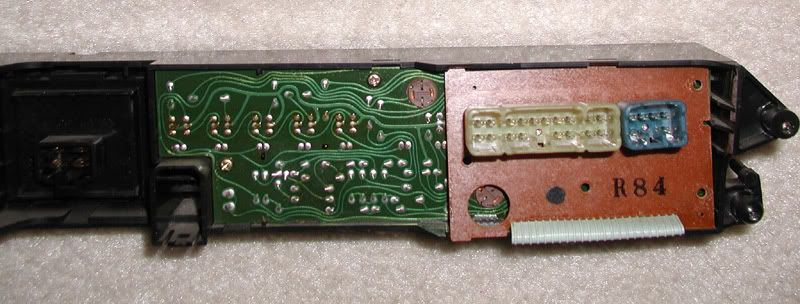 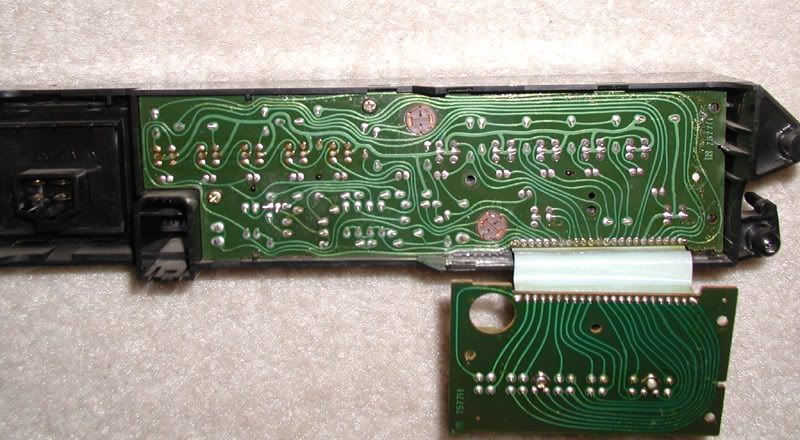 |
|
