Post by Joel87GT on Sept 26, 2004 17:06:27 GMT -5
Coloring your instrumental panel can add a bit excitement to your drive.  Well what led me to do this write up is because there is no write up for doing up your instrumental panel. All you see is people posting their end results pics. One guy - Chris embedded LEDs for his boost. Cool setup. Anyways this isnt rocket science. At first attempt will take some moving some panels around with your body in many akward positions under dash. Yeah, Haynes manual give you the directions but it doesnt give you any insite of things you may encounter ~ "Well as explained from doing so." For you new comers here - I hope this helps.
 ............
www.turbocelica.8m.com.......................www.procarparts.com/
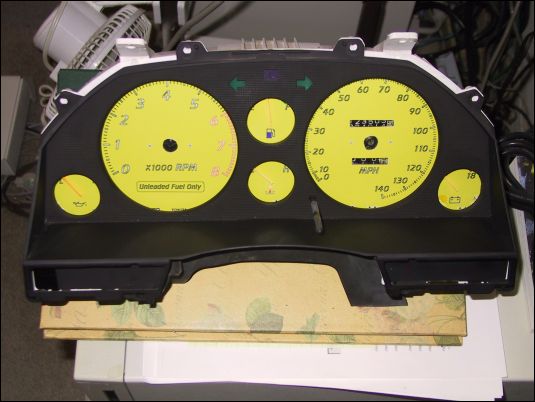
Product: TOYOTA CELICA 87-88 EURO REVERSE GLOW GAUGES
SKU: TY87CC-0167RGX
Description:
1987-1988 TOYOTA CELICA GT WITH 120MPH TOP SPEED EURO REVERSE GAUGES -INCLUDES 2-COLOR BLUE/GREEN INVERTER SWITCH -NUMBERS & MARKINGS WILL GLOW AT NIGHT 4 TOTAL COLORS-RED,LIGHTGREEN,BLUE,HYPERBLUE -SCRATCH RESISTANT,ANTI-GLARE SURFACE
Price: US$35.98

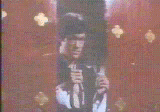
Here's a drive to the BatCave.
*background color panel
*aftermarket neon lights
*Add boost gauges
*Routing Tachometer to mount above dash.


Bulbs194's: 194R for red 194B for blue
www.bionyxindustries.com/[/ul]
However, you mod your instrumental panel this method will familiarize you by removing and installing your instrumental panel. The first time maybe be hard, 2nd time a charm. Right - 9600? Look at both instrumental lights red and white setup. Which is comfortable for your eyes. Does the red make your eyes lean to the left? If so - how will see the road? I plan on installing blue soon- tired of white.
Haynes Reference. Chap 11-15 note 21
Tools needed: Thumb size Philips screw and Flat Head screw driver.
:oFIRST DISCONNECT BATTERY
1. Remove trim held by two black screws. Pull out both Push Button Defrost and Hazard buttons carefully and remove the connectors.
Once your remove the push buttons – remove the other two hidden black screws. The instrumental trim will come off.
2. Now unbolt the lower part of the steering column dash panel. You will need to remove the two hidden black screws holding the lower part of the instrumental panel. Now remove the other two black screws holding the instrumental panel at the top.
You may want to lower your steering column in order to remove the instrumental panel.
3. Remove the 4brass screw from the top instrumental panel holding it in place. Instrumental panel is able to be pulled out. You will see three connectors pinched in with green data cable mounted on the back side of the instrumental panel. The three ribbon connectors (remember from left to right) detach by depressing each ribbon connector to disconnect from back panel. Once disconnected leave connectors in place in where installed for reinstallation.
(You will have to fish, adjust the cumbersome panel out between your dash and steering wheel. Careful not to break, crack the green data ribbons).
4. You now have the trim and instrumental panel out – The clear protective instrumental panel can be removed by depressing the two black thumb locks.
5. Remove the rest of the 4 black screw backside of the trim.
6. Now Paint with your heart content. – To install reverse this process - Remember to install the speedo cable properly - its neon green looking and slides back into your dashboard.. The speedo cable inside the NEON Green connectors is squared fitting so do be sure that you line up the fittings.
Aftermarket & Gauges
Bulbs - "194's 194R for red 194B for blue.
schmooot
Neon Edge - theneonedge.com/performance/performanceupgrade.htm
9600-tachometers, cluster guages
Lumin Face Plates - www.2kracing.com/product_info.php/cPath/9_65_188/products_id/2002
It says fits all celica..Hmmm.
Euro Reverse Gauges
www.procarparts.com/store-detail.asp?sku=TY87CC%2D0167RGX&dbname=onlinestoreDB
White87GT
Conclusion
Finally finished this write up. It was a PITA and I hope the information read here will bring excitement to your every day / night drive. What next huh? Maybe upgrading your steering wheel from APC to compliment your cool looking instrumental panel.
All materials researched on 4gcelica.net and google.com.
Peace
 Well what led me to do this write up is because there is no write up for doing up your instrumental panel. All you see is people posting their end results pics. One guy - Chris embedded LEDs for his boost. Cool setup. Anyways this isnt rocket science. At first attempt will take some moving some panels around with your body in many akward positions under dash. Yeah, Haynes manual give you the directions but it doesnt give you any insite of things you may encounter ~ "Well as explained from doing so." For you new comers here - I hope this helps.............
www.turbocelica.8m.com.......................www.procarparts.com/
Product: TOYOTA CELICA 87-88 EURO REVERSE GLOW GAUGES
SKU: TY87CC-0167RGX
Description:
1987-1988 TOYOTA CELICA GT WITH 120MPH TOP SPEED EURO REVERSE GAUGES -INCLUDES 2-COLOR BLUE/GREEN INVERTER SWITCH -NUMBERS & MARKINGS WILL GLOW AT NIGHT 4 TOTAL COLORS-RED,LIGHTGREEN,BLUE,HYPERBLUE -SCRATCH RESISTANT,ANTI-GLARE SURFACE
Price: US$35.98
Here's a drive to the BatCave.
*background color panel
*aftermarket neon lights
*Add boost gauges
*Routing Tachometer to mount above dash.
Bulbs194's: 194R for red 194B for blue
www.bionyxindustries.com/[/ul]
However, you mod your instrumental panel this method will familiarize you by removing and installing your instrumental panel. The first time maybe be hard, 2nd time a charm. Right - 9600? Look at both instrumental lights red and white setup. Which is comfortable for your eyes. Does the red make your eyes lean to the left? If so - how will see the road? I plan on installing blue soon- tired of white.
Haynes Reference. Chap 11-15 note 21
Tools needed: Thumb size Philips screw and Flat Head screw driver.
:oFIRST DISCONNECT BATTERY
1. Remove trim held by two black screws. Pull out both Push Button Defrost and Hazard buttons carefully and remove the connectors.
Once your remove the push buttons – remove the other two hidden black screws. The instrumental trim will come off.
2. Now unbolt the lower part of the steering column dash panel. You will need to remove the two hidden black screws holding the lower part of the instrumental panel. Now remove the other two black screws holding the instrumental panel at the top.
You may want to lower your steering column in order to remove the instrumental panel.
3. Remove the 4brass screw from the top instrumental panel holding it in place. Instrumental panel is able to be pulled out. You will see three connectors pinched in with green data cable mounted on the back side of the instrumental panel. The three ribbon connectors (remember from left to right) detach by depressing each ribbon connector to disconnect from back panel. Once disconnected leave connectors in place in where installed for reinstallation.
(You will have to fish, adjust the cumbersome panel out between your dash and steering wheel. Careful not to break, crack the green data ribbons).
4. You now have the trim and instrumental panel out – The clear protective instrumental panel can be removed by depressing the two black thumb locks.
5. Remove the rest of the 4 black screw backside of the trim.
6. Now Paint with your heart content. – To install reverse this process - Remember to install the speedo cable properly - its neon green looking and slides back into your dashboard.. The speedo cable inside the NEON Green connectors is squared fitting so do be sure that you line up the fittings.
Aftermarket & Gauges
Bulbs - "194's 194R for red 194B for blue.
schmooot
Neon Edge - theneonedge.com/performance/performanceupgrade.htm
9600-tachometers, cluster guages
Lumin Face Plates - www.2kracing.com/product_info.php/cPath/9_65_188/products_id/2002
It says fits all celica..Hmmm.
Euro Reverse Gauges
www.procarparts.com/store-detail.asp?sku=TY87CC%2D0167RGX&dbname=onlinestoreDB
White87GT
Conclusion
Finally finished this write up. It was a PITA and I hope the information read here will bring excitement to your every day / night drive. What next huh? Maybe upgrading your steering wheel from APC to compliment your cool looking instrumental panel.
All materials researched on 4gcelica.net and google.com.
Peace


 but i bety if you found the right paint it would work niceley